How to Build a Personal Blog with AI Agents from Scratch
A practical workflow for using AI agents to build a blog without letting the project drift.
I have always believed that one real build teaches more than a hundred passive tutorials.
Building a personal blog is a good “Hello World” project for learning AI-assisted development. It is small enough for a beginner to finish, but real enough to expose the parts of software work that a single prompt cannot solve: product scope, information architecture, visual direction, content workflow, SEO, deployment, testing, and long-term maintenance.
This article is a practical guide for beginners who want to build a personal blog with an AI agent. It is not a line-by-line coding tutorial. The more important lesson is how to design the working environment around the agent so that the agent can produce useful work without drifting away from your goals.
That philosophy is close to what OpenAI described in its article on harness engineering: as agents become more capable, the human role shifts from writing every line of code to defining intent, shaping the environment, and building feedback loops that make agent work reliable.
The live site is here, and the source is available in the GitHub repository.
What You Are Building
Before asking an AI agent to code, define the product.
For a beginner, this step feels slower than prompting. In practice, it saves time because it removes unnecessary decisions before the agent starts generating files.
A website usually has two broad parts:
- the frontend, which includes layout, text, buttons, links, animation, and visual style;
- the backend, which stores data, manages accounts, handles permissions, or powers dynamic behavior.
For a first personal blog, the product can be much simpler:
- only the owner can publish articles;
- readers do not need accounts;
- the site does not need likes, comments, profiles, or dashboards;
- the core experience is reading text-first articles;
- the site should be fast, crawlable, easy to deploy, and easy to maintain.
Once those constraints are clear, you probably do not need a backend for the first version. A static site is enough. That one product decision reduces the project from “build a web platform” to “build a readable publication site.”
This is the first beginner lesson: a better prompt does not replace a clear product boundary.
The Real Problem with Vibe Coding
I used VS Code with the Codex extension for this project. Other tools, such as Cursor, Claude Code, or similar agent environments, can support the same workflow.
When people first try vibe coding, they often expect the agent to complete the full product from one natural-language request. In practice, several problems appear quickly:
- the first result does not match the expected product quality;
- the user and the agent spend many turns revising a small module;
- the agent loses track of the original goal after repeated changes;
- a fix in one area introduces unrelated changes somewhere else;
- the project slowly drifts away from the original product direction.
These failures are not only model problems. They are workflow problems.
An AI agent is powerful, but it does not automatically know what should stay stable, what can change, which tradeoffs matter, or which design decisions are already settled. If all of that context lives only in your head or in a long chat thread, the project becomes fragile.
The solution is to move important context into the repository.
Build the Harness Before the Site
For a beginner, the most important part of the project is not the first page. It is the harness around the agent.
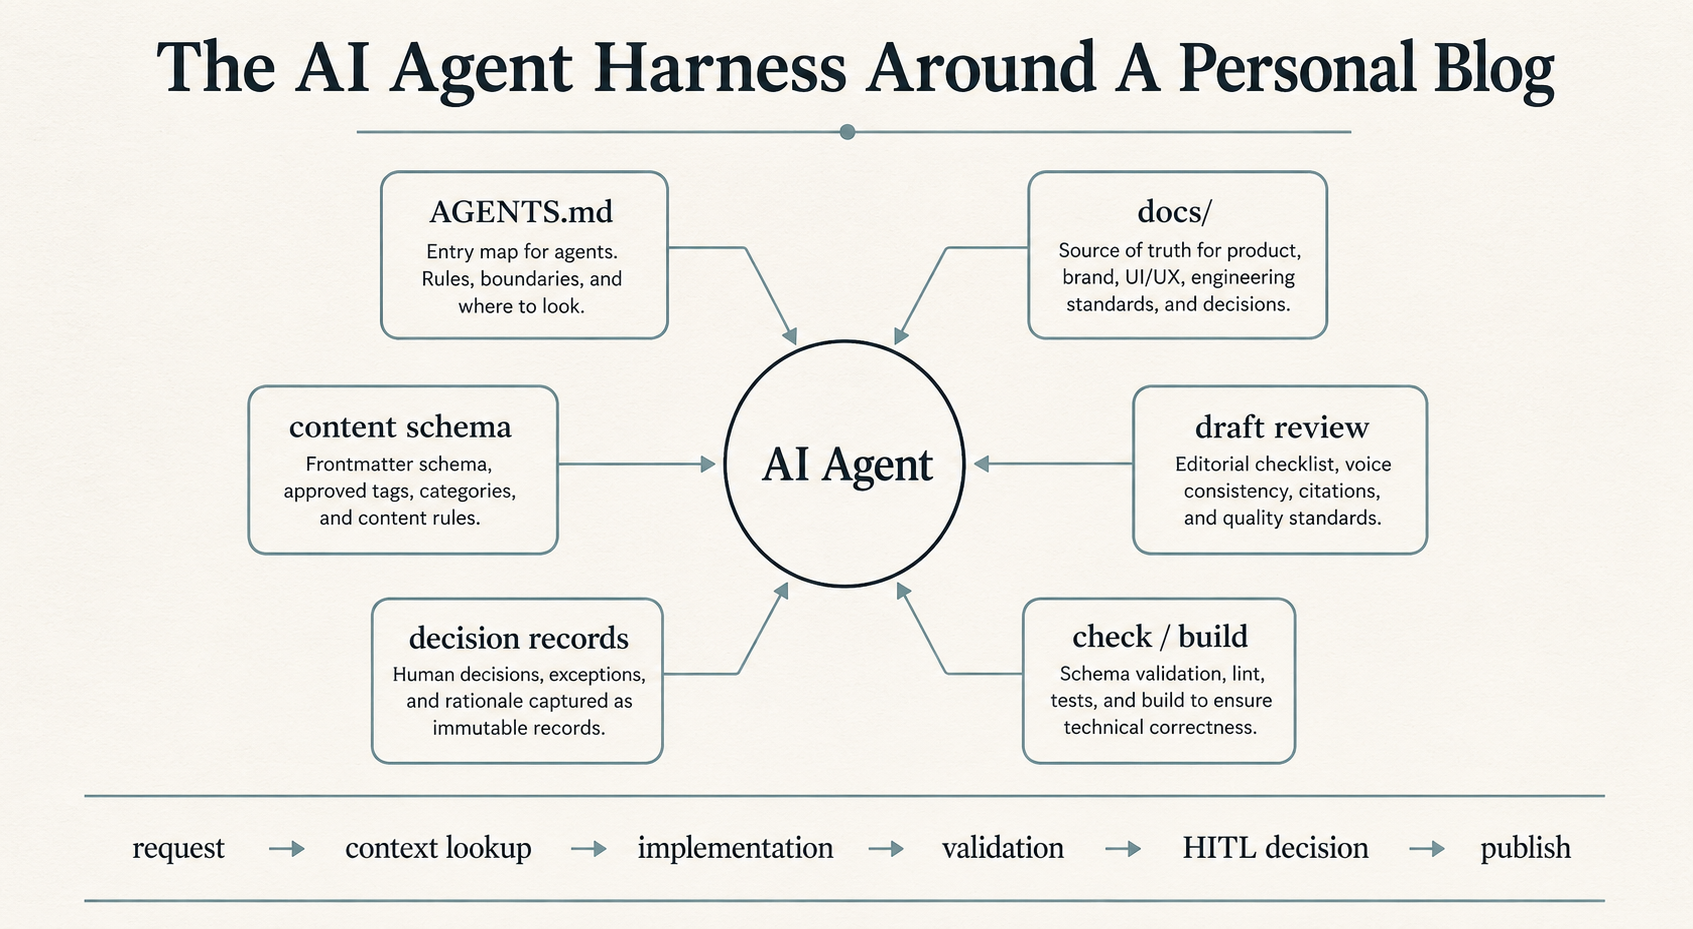
In this project, the harness is the set of files, rules, checks, and review loops that guide the agent’s behavior. It includes:
AGENTS.md, which tells the agent how to work in the repo;docs/, which stores product, brand, UI/UX, engineering, and decision rules;- content schemas, which define what a valid post looks like;
- approved tag libraries, which prevent random taxonomy drift;
- review notes, which capture editorial feedback before publishing;
- build checks, such as
npm run checkandnpm run build; - decision records, which preserve human judgment when a reusable choice is made.
This is the practical meaning of harness engineering in a small personal project. You are not trying to make the agent magical. You are building an environment where the agent can inspect the right context, follow the right constraints, and get feedback when it makes a mistake.
Without a harness, the agent is just responding to the latest prompt. With a harness, the agent is working inside a system.
Create a Docs Folder as the Source of Truth
I created a docs/ directory at the root of the project and treated it as the source of truth for the blog.
The purpose is simple: when the agent needs to make a change, it should not guess the product direction from the latest prompt alone. It should read the relevant documentation first.
For this blog, the documentation structure looks like this:
AGENTS.md
docs/
+-- README.md
+-- branding/
|   +-- brand-positioning.md
|   +-- personal-ip.md
|   +-- ...
+-- decisions/
|   +-- 2026-05-14-date-sorted-posts-and-text-first-content.md
|   +-- 2026-05-14-editorial-minimalism-ui-direction.md
|   +-- ...
+-- engineering/
|   +-- architecture.md
|   +-- conventions.md
|   +-- ...
+-- product/
|   +-- positioning.md
|   +-- ...
+-- uiux/
    +-- visual-direction.md
    +-- ...
The actual folder is visible in the repository’s docs directory.
AGENTS.md should be a map, not an encyclopedia. If it becomes too long, the agent may miss the important constraints. A better pattern is to keep AGENTS.md short and use it to point the agent toward deeper source-of-truth documents.
docs/README.md acts as the index for the documentation system. When the project grows, this map becomes more valuable because every new task can begin by finding the right context instead of rebuilding context from scratch.
What to Put in the Harness
For a beginner blog project, I would start with five kinds of documents.
First, write a product positioning document. It should explain what the site is, who it serves, what content it will publish, and what it will not do. This prevents the agent from turning a simple blog into a portfolio, social platform, or marketing site.
Second, write a brand or voice document. It should define tone, audience, and writing principles. If you want the site to feel analytical and restrained, the agent needs to know that before it creates a colorful landing page or casual copy.
Third, write a UI/UX direction document. It should define layout patterns, navigation rules, typography preferences, and visual constraints. This keeps the design consistent across pages.
Fourth, write engineering conventions. This should include folder structure, naming rules, content frontmatter, approved tags, theme tokens, and commands. These rules reduce random structural changes.
Fifth, create a decisions folder. Every time you make a reusable choice, record the context, options, decision, rationale, and impact. This gives future agent runs a memory of human judgment.
For a beginner, this may sound like a lot of writing. The practical approach is to ask the agent to draft the first version of these documents, then revise them with your own judgment. You do not need perfect documentation on day one. You need enough structure to stop the agent from wandering.
A Concrete Example: Adding a New Tag
Here is a small example of the harness in action.
Suppose I want to publish an article about AI agents. Without a harness, I might simply ask the agent:
Add a new AI tag and update the article.
The agent might add AI, ai, ai-agent, or agentic-ai in different places. It might update the article but forget the schema. It might change the homepage navigation even though the first version of the site does not use category pages.
With the harness, the same request becomes a controlled workflow:
- Check
docs/engineering/conventions.mdto see whether an approved tag already exists. - If no tag fits, stop for human confirmation.
- After approval, add the new tag to the documented tag library.
- Add the same tag to
approvedPostTagsinsrc/content.config.ts. - Create a decision record explaining why the tag exists.
- Update the draft review note so the editorial reason is visible.
- Run
npm run checkandnpm run build.
This is the difference between prompting and harnessed development. The agent is still doing the work, but the work is routed through rules, source-of-truth documents, schema validation, and human decisions.
A Beginner Build Plan
If I were starting from zero again, I would use this sequence:
- Ask the agent to help define the product scope for a simple personal blog.
- Decide whether the first version needs a backend. For most personal blogs, choose a static site.
- Ask the agent to scaffold the project with a simple framework such as Astro.
- Create
AGENTS.mdas the agent’s operating map. - Create
docs/README.mdand the first source-of-truth documents. - Ask the agent to implement the homepage and post detail page according to the docs.
- Add a content model for posts, including title, description, date, tags, hero image, and draft status.
- Add a draft review process before publishing.
- Run checks after each meaningful change.
- When a decision changes the future workflow, record it in
docs/decisions/.
The point is not to make the process heavy. The point is to create enough structure that the agent can safely move faster.
What Beginners Should Take from Harness Engineering
Harness engineering is not only for large engineering teams. The same philosophy applies to a small personal blog.
The beginner version is simple:
- put important project knowledge into files the agent can read;
- make
AGENTS.mda routing map, not a giant manual; - turn repeated preferences into documented conventions;
- use schemas and checks to catch mistakes mechanically;
- record human decisions when they create reusable rules;
- treat every agent failure as a signal that the harness is missing context, constraints, or feedback.
This changes how you collaborate with AI. You are not just asking the model to write code. You are designing the environment that makes good code more likely.
That is why a personal blog is a useful first project. At the end, you have a working website. More importantly, you have practiced the engineering habit that matters in the agent era: building the context, rules, and feedback loops that allow AI agents to do reliable work.